Se dobbiamo trasferire dei file dal nostro PC alla Raspberry o viceversa senza utilizzare scomode chiavette USB è sufficiente installare un server FTP per poterlo fare comodamente sfruttando la connessione di rete.
Installazione del server FTP
Ci sono diverse applicazioni FTP disponibili per Raspberry, in questo esempio vediamo come installare proftpd.
Per farlo basta digitare il seguente comando:
sudo apt install proftpd
Per verificare la corretta installazione digitiamo il comando:
proftpd -v
il risultato che otteniamo:
ProFTPD Version 1.3.5b
…a seconda della versione disponibile.
Login del client FTP
A questo punto possiamo già accedere al server dal nostro PC utilizzando le credenziali di accesso della raspberry (es. quelle di default user: pi password: raspberry)

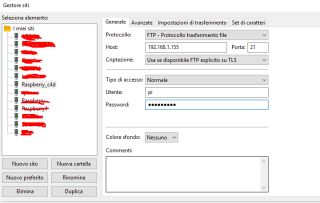
Come potete vedere nell’immagine ho creato una connessione con nome Raspberry_c4d alla mia raspberry con indirizzo ip 192.168.1.155 (verificate il vostro ip con il comando ifconfig) sulla porta 21.
Nel mio caso ho utilizzato le credenziali del utente root quindi pi / raspberry (sarebbe meglio aver cambiato la password all’utente root), in questo modo ho accesso con il massimo dei privilegi a tutte le cartelle della Raspberry.
Configurazione del server
Per prima cosa troviamo il file di configurazione proftpd.conf che si trova nel percorso:
/etc/proftpd/proftpd.conf
per farlo utilizziamo il comando nano.
sudo nano /etc/proftpd/proftpd.conf
il file di configurazione è il seguente:
#
# /etc/proftpd/proftpd.conf -- This is a basic ProFTPD configuration file.
# To really apply changes, reload proftpd after modifications, if
# it runs in daemon mode. It is not required in inetd/xinetd mode.
#

# Includes DSO modules
Include /etc/proftpd/modules.conf

# Set off to disable IPv6 support which is annoying on IPv4 only boxes.
UseIPv6				on
# If set on you can experience a longer connection delay in many cases.
IdentLookups			off

ServerName			"Debian"
# Set to inetd only if you would run proftpd by inetd/xinetd.
# Read README.Debian for more information on proper configuration.
ServerType				standalone
DeferWelcome			off

MultilineRFC2228		on
DefaultServer			on
ShowSymlinks			on

TimeoutNoTransfer		600
TimeoutStalled			600
TimeoutIdle			1200

DisplayLogin                    welcome.msg
DisplayChdir               	.message true
ListOptions                	"-l"

DenyFilter			\*.*/

# Use this to jail all users in their homes
# DefaultRoot			~

# Users require a valid shell listed in /etc/shells to login.
# Use this directive to release that constrain.
# RequireValidShell		off

# Port 21 is the standard FTP port.
Port				21

# In some cases you have to specify passive ports range to by-pass
# firewall limitations. Ephemeral ports can be used for that, but
# feel free to use a more narrow range.
# PassivePorts                  49152 65534

# If your host was NATted, this option is useful in order to
# allow passive tranfers to work. You have to use your public
# address and opening the passive ports used on your firewall as well.
# MasqueradeAddress		1.2.3.4

# This is useful for masquerading address with dynamic IPs:
# refresh any configured MasqueradeAddress directives every 8 hours
<IfModule mod_dynmasq.c>
# DynMasqRefresh 28800
</IfModule>

# To prevent DoS attacks, set the maximum number of child processes
# to 30.  If you need to allow more than 30 concurrent connections
# at once, simply increase this value.  Note that this ONLY works
# in standalone mode, in inetd mode you should use an inetd server
# that allows you to limit maximum number of processes per service
# (such as xinetd)
MaxInstances			30

# Set the user and group that the server normally runs at.
User				proftpd
Group				nogroup

# Umask 022 is a good standard umask to prevent new files and dirs
# (second parm) from being group and world writable.
Umask				022  022
# Normally, we want files to be overwriteable.
AllowOverwrite			on

# Uncomment this if you are using NIS or LDAP via NSS to retrieve passwords:
# PersistentPasswd		off

# This is required to use both PAM-based authentication and local passwords
# AuthOrder			mod_auth_pam.c* mod_auth_unix.c

# Be warned: use of this directive impacts CPU average load!
# Uncomment this if you like to see progress and transfer rate with ftpwho
# in downloads. That is not needed for uploads rates.
#
# UseSendFile			off

TransferLog /var/log/proftpd/xferlog
SystemLog   /var/log/proftpd/proftpd.log

# Logging onto /var/log/lastlog is enabled but set to off by default
#UseLastlog on

# In order to keep log file dates consistent after chroot, use timezone info
# from /etc/localtime.  If this is not set, and proftpd is configured to
# chroot (e.g. DefaultRoot or <Anonymous>), it will use the non-daylight
# savings timezone regardless of whether DST is in effect.
#SetEnv TZ :/etc/localtime

<IfModule mod_quotatab.c>
QuotaEngine off
</IfModule>

<IfModule mod_ratio.c>
Ratios off
</IfModule>


# Delay engine reduces impact of the so-called Timing Attack described in
# http://www.securityfocus.com/bid/11430/discuss
# It is on by default.
<IfModule mod_delay.c>
DelayEngine on
</IfModule>

<IfModule mod_ctrls.c>
ControlsEngine        off
ControlsMaxClients    2
ControlsLog           /var/log/proftpd/controls.log
ControlsInterval      5
ControlsSocket        /var/run/proftpd/proftpd.sock
</IfModule>

<IfModule mod_ctrls_admin.c>
AdminControlsEngine off
</IfModule>

#
# Alternative authentication frameworks
#
#Include /etc/proftpd/ldap.conf
#Include /etc/proftpd/sql.conf

#
# This is used for FTPS connections
#
#Include /etc/proftpd/tls.conf

#
# Useful to keep VirtualHost/VirtualRoot directives separated
#
#Include /etc/proftpd/virtuals.conf

# A basic anonymous configuration, no upload directories.

# <Anonymous ~ftp>
#   User				ftp
#   Group				nogroup
#   # We want clients to be able to login with "anonymous" as well as "ftp"
#   UserAlias			anonymous ftp
#   # Cosmetic changes, all files belongs to ftp user
#   DirFakeUser	on ftp
#   DirFakeGroup on ftp
#
#   RequireValidShell		off
#
#   # Limit the maximum number of anonymous logins
#   MaxClients			10
#
#   # We want 'welcome.msg' displayed at login, and '.message' displayed
#   # in each newly chdired directory.
#   DisplayLogin			welcome.msg
#   DisplayChdir		.message
#
#   # Limit WRITE everywhere in the anonymous chroot
#   <Directory *>
#     <Limit WRITE>
#       DenyAll
#     </Limit>
#   </Directory>
#
#   # Uncomment this if you're brave.
#   # <Directory incoming>
#   #   # Umask 022 is a good standard umask to prevent new files and dirs
#   #   # (second parm) from being group and world writable.
#   #   Umask				022  022
#   #            <Limit READ WRITE>
#   #            DenyAll
#   #            </Limit>
#   #            <Limit STOR>
#   #            AllowAll
#   #            </Limit>
#   # </Directory>
#
# </Anonymous>

# Include other custom configuration files
Include /etc/proftpd/conf.d/
Modifica del nome server
Il primo parametro da modificare è il nome del server ServerName che nel mio caso si trova alla riga 15. Potete mettere il nome che preferite anche se sarebbe meglio utilizzare quello del server.
ServerName "Raspberry SERVER"
Cartella principale
Il parametro DefaultRoot indica la cartella principale alla quale l’utente si collegherà al login.
# DefaultRoot ~
Di default si utilizza il carattere ~ per indicare la cartella utente, ma se volessimo utilizzare una cartella differente basterà togliere il commento “#” ed indicare la nuova cartella principale.
DefaultRoot /var/www
In questo modo tutti gli utenti avranno accesso solo alla cartella /var/www.
Utenti e permessi
Supponiamo di voler creare un utente chiamato userftp che vogliamo si connetta alla cartella /var/www in modo che possa modificare i file del nostro web server, per prima cosa andiamo a creare un gruppo chiamato web-admin.
il comando è:
sudo addgroup web-admin


Creiamo l’utente userftp.
sudo useradd userftp
Ora associamo l’utente userftp al gruppo web-admin.
sudo usermod -a -G web-admin userftp
Per verificare la corretta associazione dell’utente al gruppo utilizziamo il comando:
sudo id -G -n userftp
Se è tutto corretto otterremo come risposta:
userftp web-admin
Ora aggiungiamo la crtella di default per il gruppo web-admin modificando il file di configurazione aggiungendo la seguente riga subito dopo il parametro DefaultRoot.
DefaultRoot /home/public_html web-admin
il file di configurazione è sempre /etc/proftpd/proftpd.conf
Alla fine riavviamo il servizio con il comando
sudo service proftpd restart
Associamo quindi il gruppo web-admin la cartella e diamogli i permessi di modifica con i seguenti comandi:
sudo chgrp web-admin /var/www
sudo chmod 775 /var/www
Per maggiori dettagli sul comando chmod relativo ai permessi di modifica sulle cartelle vi rimando alla pagina wikipedia con tutti i dettagli: https://it.wikipedia.org/wiki/Chmod.